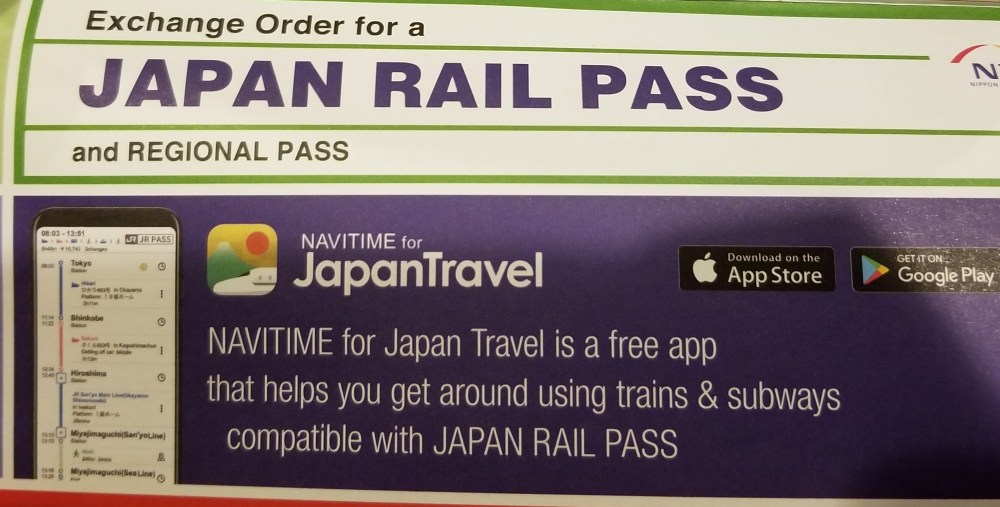
You’ve booked your Japan trip, you’ve received your JR Pass Voucher and you’ve probably planned out tons of great bullet train adventures. Getting from Point A to Point B in minimal time, without having to pay anything extra for seat reservations… ahh… what a beautiful concept!
If this is your first time using the JR Pass, you might have so many plans for your pass, but perhaps you aren’t sure where to start. You’ve probably read blog post after blog post trying to figure out the best way to go about all of this, if you’re anything like me.
The first time I used it, the process was a blur because my friend who speaks Japanese fluently, lead the way through everything. The second time I used it, it was all on me and I’ll admit, I was a little nervous.
I’m going to make it very simple for you. Keep reading, this is really all you have to do.
Step One: Ordering Your Voucher
First thing you need to do is order your voucher online through an authorized dealer, while still in your country, within 3 months of your plan to exchange it. They did a temporary deal where you could purchase one in Japan for a higher price, but that deal is no longer valid and I’m not sure if they’ll bring it back. I ordered mine from Japan-Rail-Pass. I ended up ordering Suica cards and Pocket WiFi through them as well and have nothing but good things to say. This post is not sponsored, I just had a great experience and wanted to pass the info along.
You’ll order the voucher with your information on it. There is no field for your middle name, if you have one. You can either put it paired with your first name in the same field, or you can omit it. I’ve heard people say you shouldn’t leave it out if you have one, and that’s probably true, if you know beforehand. I didn’t know this and did not put my middle name. Japanese people do not have middle names and this wasn’t a problem, whatsoever. They didn’t even give my name a double take, they accepted it straight away. (Also was a dummy and forgot my middle name on my international flight boarding pass, but there were no problems there, either!)
After ordering your voucher, it will arrive within the given shipping time. If you’re pressed for time, you can contact the staff at Japan-Rail-Pass and they can usually overnight it to you. I’m not sure how many other authorized pass holders will do this, though.
Step Two: Exchanging Your Voucher
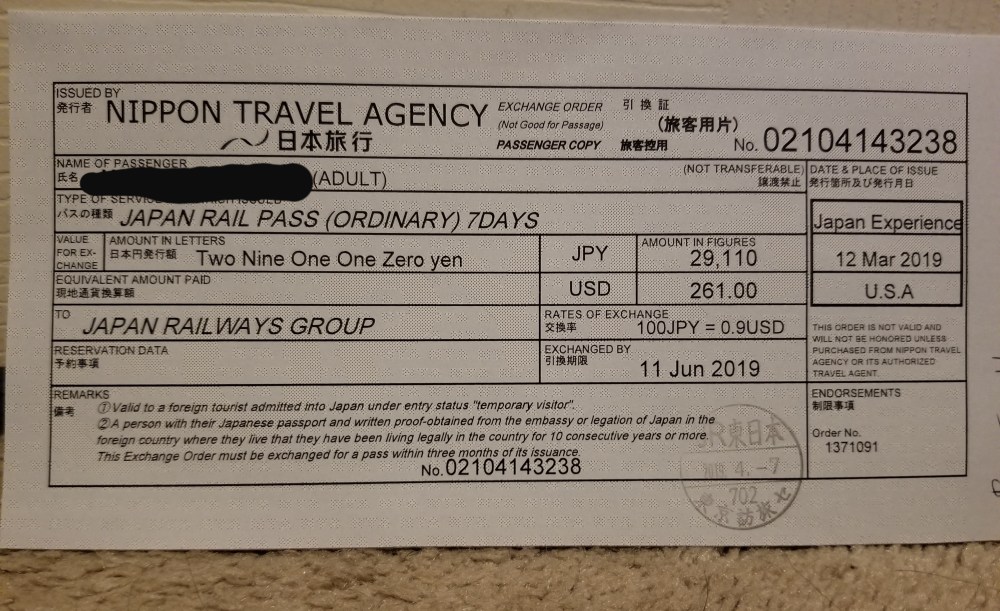
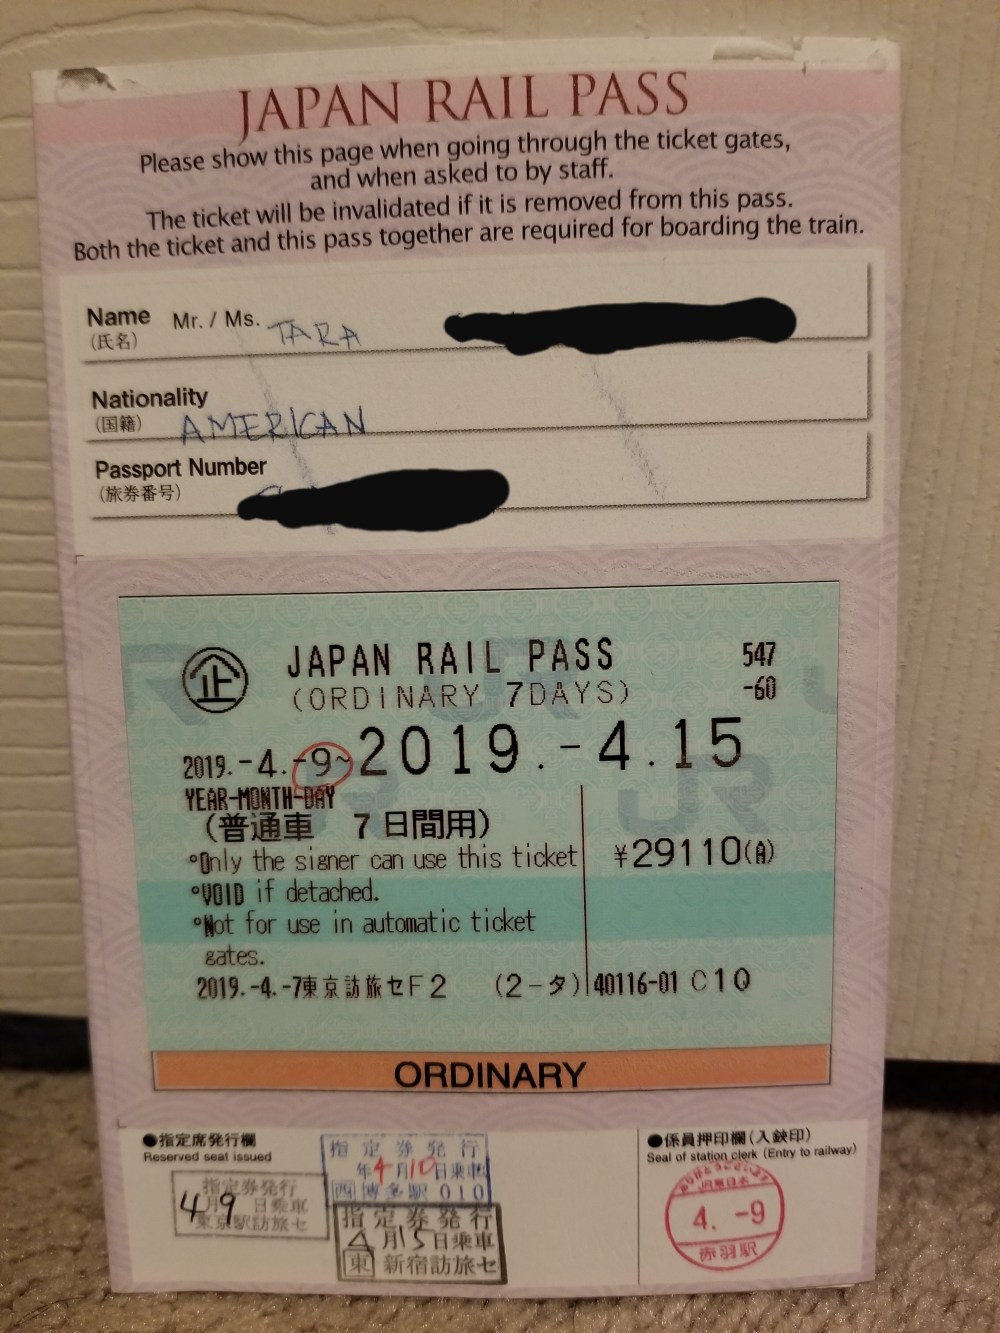
Once you get into Japan, you’ll exchange your voucher. You can do this at anytime, even before the day you want to activate it. When you’re filling out the exchange form, you will write in the activation date. We activated ours on the 9th of April, but we exchanged it on the 7th. Exchanging it seemed scary, but it was really so easy.
There are several exchange offices in Japan (Japan-Rail-Pass has a list of them). I exchanged at the JR East Travel Center (New South Gate) in Shinjuku. It was probably around 11 AM and it wasn’t too crowded. There was a very friendly employee outside, seeing us looking around confused, and let us know we were in the right spot, leading us inside. There is a small form you fill out and make sure you have your passport with you when you exchange. I mean, technically you should have your passport on you, anyway, but just make sure you have it here or you won’t be able to exchange it.
It was sakura season while I was there last, and because it was considered busy season, we were only allowed to reserve one Shinkansen trip at the time of voucher exchange. This might vary from season to season, office to office. In the JR East Travel Center, most employees spoke English, and most of them were tri-lingual. They wore flag pins on their blazers, representing the country of the language they could speak. This office had English, Korean, French, Chinese and German– that I noticed, which was pretty cool.
Just hand over your voucher and filled out forms along with your passport and they do the rest. They’ll confirm your activation date with you and go over the basic rules. They even have a short video right there on an iPad that they showed us, while he did the paperwork. After our passes were exchanged, he asked if we wanted to book a reserved train and we already knew we needed one to Fukuoka on the day our pass activated, so very quickly, he had four tickets handed over to us. The first leg of the journey was reserved seating with specific seat numbers. The second leg after our transfer was fully booked, so it was unreserved. Just know that you can end up on an unreserved Shinkansen and you might have to stand in the aisle for… well, from Kobe to Hiroshima. So that wasn’t exactly pleasant, but hey, it can happen.
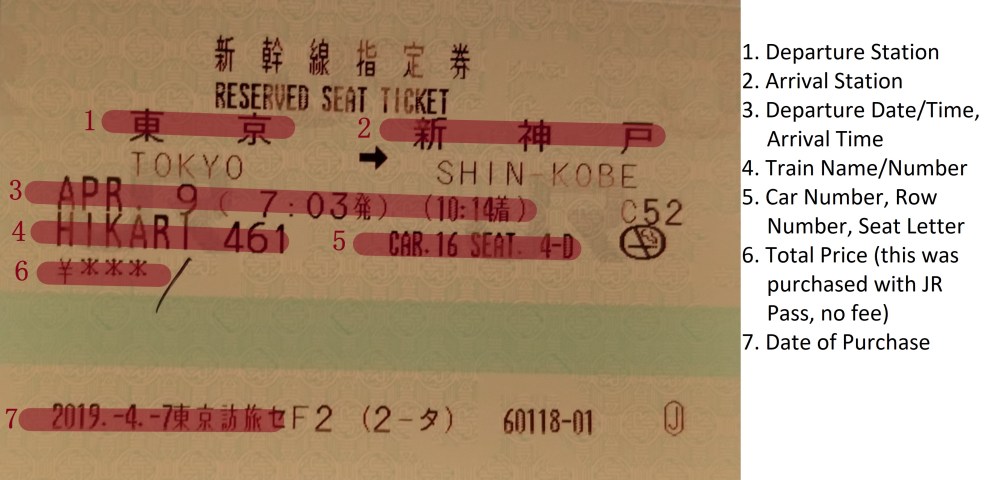
The tickets are very straight forward and tell you what train number, car number and seat number you need. If you’re not sure of your platform, you can find your train number on one of the many LED signs in the station. They display the Shinaknsen train numbers and what platform they’ll be at, as well as what time the train is scheduled to arrive. If you get lost, don’t be scared to ask a JR attendant, they are really good at helping you understand where you need to go.
Step Three: Booking Shinkansen Tickets
If you know you’ll be taking a train, I would recommend booking your tickets at least three days in advance. You can book further in advance if you know ahead of time, there’s no harm in preparation. You’re more likely to get that safely reserved seat when you book a few days in advance. Especially on more popular routes (like Tokyo>Osaka or Tokyo>Kyoto, and return).
You’ve possibly already had a taste of this, if you booked one while you exchanged your voucher. You can book them at any JR ticket office (Midori no Madoguchi) and some of the small ones you might find, will possibly have attendants that don’t speak much English. It’s always helpful to just have your travel information written down on a piece of paper. That way, if they don’t speak English, you can give them the paper and let them know how many tickets you need. Give them your JR Passes and they will get you your tickets. At Hakata station in Fukuoka, the two attendants spoke less English than I spoke Japanese, but because I had it written down, there were no issues getting us our tickets.
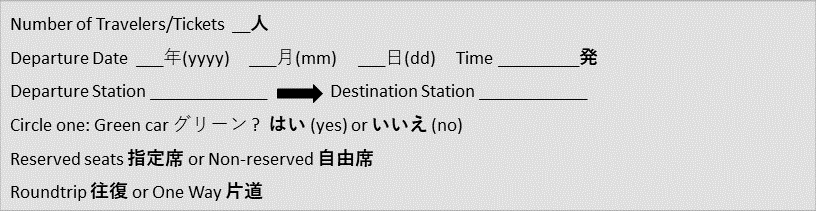 Bonus: I’ve made a PDF sheet with the photo above (enough for 5 trips). You can print it out and take along, cut off each strip every time you’d like to use the Shinkansen. Use a pen other than black ink, if possible, for ease of station attendant.
Shinkansen Form
The first time you do this, it might feel a little bit scary, and I completely get that. I was nervous but I wanted to get my money’s worth outta that dang pass, so I sucked it up and went into the ticket office, finding out it was much easier than I anticipated.
That’s really all you have to do. Go into the JR Ticket office with your departure dates, locations, times and hand that over with your JR Pass. If there are no available reserved seats, they’ll get you an unreserved ticket.
Using Your JR Pass on local trains is even simpler. Just flash your pass to the gate attendants and they will usher you through. Half the time, they don’t even look at them. It’s very easy to use. Just remember that things like Subway Metros and privately ran trains aren’t valid with the JR Pass. You’ll need to purchase separate tickets for them. I recommend getting a public transport pass, like a Suica or Pasmo card, because it makes train fair so much easier, not having to figure how much you’ll need and just swiping your way through the gates. You can reload them at the ticket machines, which have convenient English options.
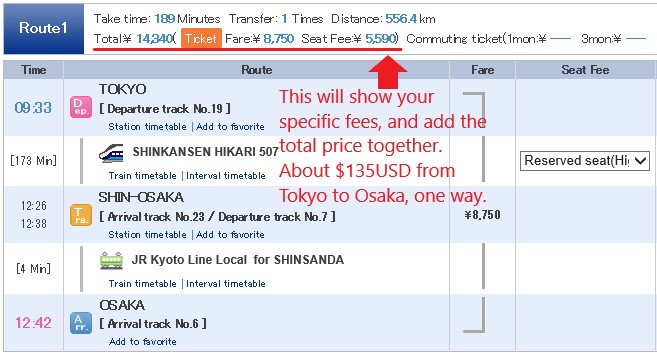
A lot of people have that question of whether or not to drop the money on a JR Pass, and I understand the hesitation. If you plan on making a return trip on the shinkansen, or more than one ride, it probably has already paid for itself. Use Hyperdia to plug in your routes and see what the train fair and seat reservation fees will be, and then you’ll know if the pass is worth it. Remember that without the pass, you also need to pay a seat reservation fee for reserved seating, so pay attention to that on your Hyperdia route as well. If it’s right around the same price, and you still plan on using local JR trains, then take that into consideration as well. You probably have already made up for the price of the JR Pass.
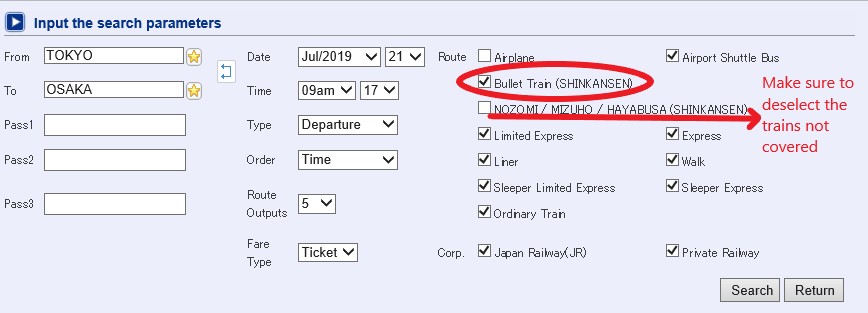
A little tip with Hyperdia, you can scroll to the bottom of the page after searching a route and there are filters you can check/uncheck. The JR Pass isn’t valid on Nozomi, Mizuho and Hayabusa trains, so you can uncheck that box, as well as all other modes of transportation you don’t want it to consider for your route. (You can simply deselect all of them except for Bullet Train SHINKANSEN, and Ordinary Train/Limited Express in case the bullet train doesn’t stop there, to make things easier.)
It only takes a couple of times to get in the groove of using the Shinkansen and reserved tickets. Once you get over that nervousness of getting in there and booking it, you’ll see how easy it is, and have so much of Japan available to you in a matter of hours.
Have you been on the Shinkansen? What are some of your tips or favorite experiences?

https://wp.me/p1JnVX-kj
You have a comprehensive writeup on this. Mine is the shorter version.
LikeLiked by 1 person
Thanks for checking it out 🙂 yours is great, too! Short, but to the point!
LikeLike