This is an incredibly long post, so grab some snacks to eat along the way. This itinerary would be good for someone on their first trip to Japan, as it covers the major areas. But there are a lot of ideas even if this isn’t your first trip, too, so read on!
Know before you go:
*Always book your lodgings as far in advance as you can, especially if visiting in Spring or Autumn. Trust me. I use a mix of booking.com, agoda.com and airbnb.
*The Japan Rail Pass will be worth it on this trip. You can read my post on the pass here. Make sure you order it before your trip.
*Book yourself a pocket wifi and Suica card. I use Japan-Rail-Pass and they are amazing.
*If this is your first international trip, I have a packing post, as well as printable packing lists.
*I also have several Japan Scavenger Hunt printables, if you’re looking for ways to take more photos and activities along the way.
*Make sure you get yourself travel insurance, if you don’t already have that through private insurance. I’ve always used World Nomads.
*Do you think you’ll buy too much to bring back home? A great solution to this is to pack a foldable duffle bag. I own Wandf 28″ and 32″, they pack down small.
Did you know?
*Most restaurants have lunch sets and dinner sets. Dinner sets are always at least a few hundred yen more. You can save money by eating out for lunch, and cooking in for dinner or stopping by the convenience store.
*A lot of train stations have lockers available for a small fee. If you ever go overboard shopping and don’t want to carry your bags, you can store them in a locker until you’re heading back to your lodging.
*Garbage cans are hard to come by! It’s always a good idea to carry a garbage sack in your bag/backpack just in case it’s needed.
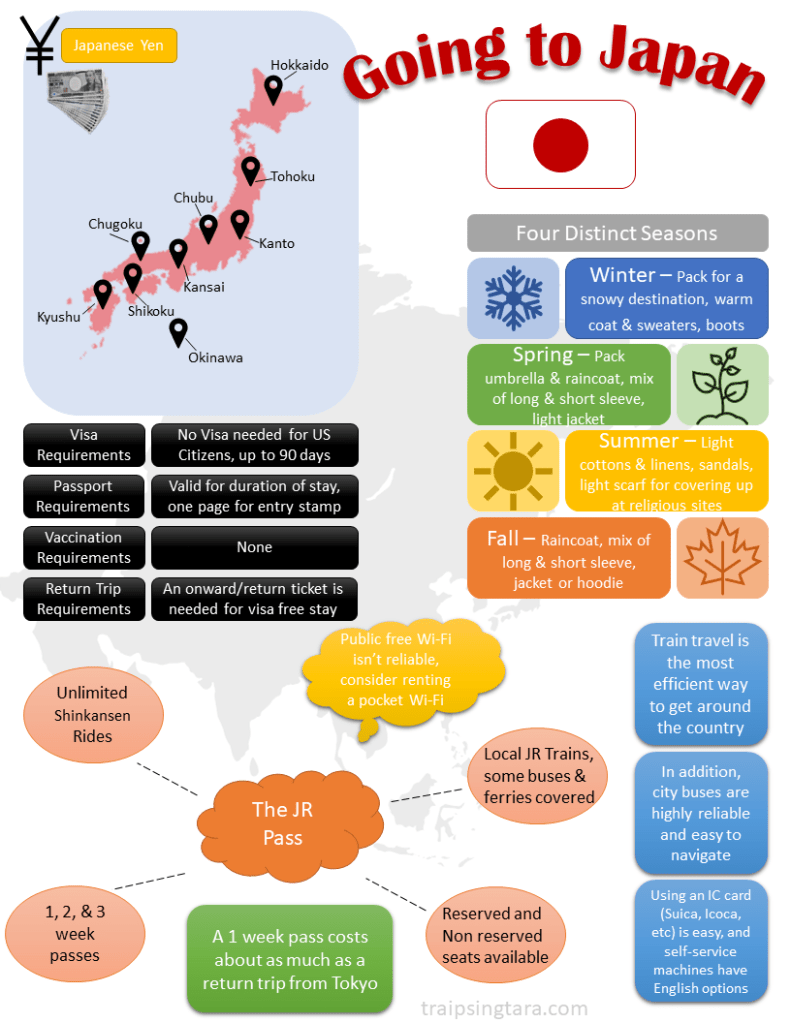
This Itinerary can be rearranged to fit your needs if you fly into Osaka, or out from Osaka, Tokyo, whichever. This is definitely not made to only follow to a T. You can pick and choose as you like, of course! I like to experience things that aren’t as crowded, or maybe not as known, so I’ll include some of those options along the way, as well as the more known sights, to help you get a balance of what you like best. I’ll just put a ton of different options so you can pick as many or as little as you’d like.
This itinerary will suggest a 1 week JR Pass (you can do it for the full two if you have the funds, because you’re already going to get your money’s worth and you’ll be able to use it for a lot of your Tokyo adventures and day trips).

Day 1
-Land in Tokyo
-Pick up pocket wifi and book a train
-Get checked into your accommodation
I don’t think you should do too much on your first day, especially since most flights land in the afternoon or early evening. One thing I do want to mention is get yourself a Suica or Pasmo card before you depart, already loaded with some yen. This way, when you reach your first local train, you don’t have to figure out what you’re doing. Just swipe and go.
I recommend booking a pocket wifi, which you can pick up in the airport. I used Japan-Rail-Pass and it was very affordable as well as reliable. This is also who I booked my JR Pass through, as well as ordered my Suica cards. I will definitely use them again.
If you land in Narita, take the NEX, Narita Express, and if you are activating a JR Pass on day 1, you can do that here at the airport, and the train is covered. If you only have a 1 week JR Pass and are not activating today, you can still book the NEX train into Tokyo for 3020 yen. If you’re going to Shinjuku, Shibuya, Ikebukuro or Shinagawa, it will be 3190 yen. Time table is 1 hour to 1 1/2 hours, depending on your final destination.
The Keisei Skyliner is a faster option, and might overall be the better option if you’re not activating your JR Pass. It will get you to Ueno station in about 40 minutes and costs 2470 yen. You’ll, of course, want to base this off of where your first accommodation is, and weigh your convenience versus price. If you’re not pinching pennies here, I would go with the most convenient. Take whatever gets you closer. You might want to look into the Limousine bus as well, if price isn’t a big deal.
If price is the main point here for you and you’d rather spend less money and more time on the train, there’s also the Sobu Kaisoku line, which is a local train (not a lot of luggage storage options), that will get you to Tokyo in about 1 1/2 hours, and costs just 1320 yen. Depending what time your flight gets in, this is a great alternative to save some money.
If you land in Haneda, this is a much easier and faster trip into the city, and of course, cheaper. You can take the Tokyo Monorail for 500 yen to the Hamamatsucho station. Now you’re on the Yamanote line and can take a regular train to your closest station, most likely costing only a few hundred yen more. If you’ve already come prepared with a loaded IC card (Suica, Pasmo, Icoca), you can use this on the monorail, as well as your next local train. It’s so much easier, take my word for it since I’ve done Japan both with and without one.
The next option would be taking the Keikyu line to Shinigawa (make sure you take it toward Shingawa. Don’t want to go the wrong way!). It’s really cheap, just 300 yen to Shinagawa, which is on the Yamanote line. Now you can take a local train to your closest stop, which, again, will likely only be a few hundred more yen. If you’re activating your JR Pass this day, you can do that at the airport and use it once you switch to the Yamanote line.
The limousine bus is a cheaper option from Haneda, compared to Narita. It’s more than the train, but probably not going to cost you more than 15 USD if you decide to take it into the main areas of Tokyo, from Haneda. It’s also a good option if you’re carrying a lot of luggage, or if you have a bigger group.

So you’ve got yourself checked into your lodging, now what? You’re probably feeling tired, but are running on that excitement and maybe even a bit of anxiety from being in a different country. That’s totally normal, especially in Japan. It’s not just another country, it can feel like another world for first time visitors.
-I think the best thing to do on your first day is familiarize yourself with your area. Hopefully you’ve already done some research of what is around your lodging, but if not, no worries. Grab your day bag and head outside, walk around and see what’s in your area.
-Locate your nearest convenience stores where you can get just about anything you need, including a filling dinner. See what restaurants the area has to offer. What about parks or laundromats? It’s fun to explore the area on that first day. If you get lost, turn on your pocket wifi and google map your way back. Eat some dinner at a nearby restaurant or grab something from a konbini (convenience store) and take it back to your lodging to eat.
-Depending on your energy levels, you can go out again and explore more of Tokyo, or maybe get some early shut eye, if it’s needed. Ain’t nothing wrong with that.
Day 2
-Harajuku
-Shibuya
-Tokyo Metropolitan Building
Start your morning early and head to Harajuku.
-Grab a konbini breakfast and pack a picnic lunch. Go to Meiji Jingu, it opens at the crack of dawn. Really, you can go as early as 5 AM. You certainly don’t have to go that early, but the earlier you go, the less crowded it will be.
-After that, head to Yoyogi park and explore the large park grounds. Watch the adorable pups playing in the dog park area. Find you a perfect spot to picnic for lunch. Whenever you plan to have a picnic, make sure to carry an empty grocery sack with you for your garbage. It can be a chore to find a garbage can in Japan, so you’ll want to keep a hold of it until you find one (or even until you get back to your lodging).
It’s a really pleasant and short walk from here to Takeshita Dori street in Harajuku. You can plug Takeshita Dori into Google maps and get your walking directions from your current location, or you can use Meiji Jingu as a starting point.

-Take your time wandering the shops of Takeshita Dori, and take your time to explore the side streets. There is so much to see here, and one word of advice is to check out everything first, then go back through for purchases. Some shops have similar items, but at very different price points (I think Daiso items get marked up on the outside, even, so check Daiso first!). There are a lot of snack shops along this street, have fun stuffing your face with junk food, if that’s your thing.
The next two activities, feel free to swap depending on how crowded you want Shibuya crossing to be, or how dark you want it to be when at the Tokyo Metropolitan Building. I think it’s awesome to see the city at night, from the viewing room, so I’ve arranged it that way. However, if you want to have your cake and eat it, too, you can explore any other close areas you might want to see before heading to Shibuya crossing. That way, you can get there during rush hour and see the city lit up at night from the Metropolitan Building. Completely up to you. CV19NOTE: It is currently only open until 5PM, with last elevator call at 4:30PM. Check ahead of time in case Covid is still out there ruining everyone’s lives. If that’s the case, go there first, then to Shibuya.

-After you’ve had your fill of Harajuku, hop on the JR train to Shibuya Station, and take the Hachiko exit. This will bring you to Shibuya crossing. It’s always a sight to see the way everyone crosses at once. It’s even more interesting when it’s raining, and everyone has an umbrella. There are a lot of cool stores in this area. Tower Records, if you’re into any Japanese music/media, the Disney Store, Shibuya 109 for fashion, and have fun exploring more. There are tons of restaurants (and vegan options, too!) in this area. You can explore to your heart’s content, and find a good place to eat dinner.
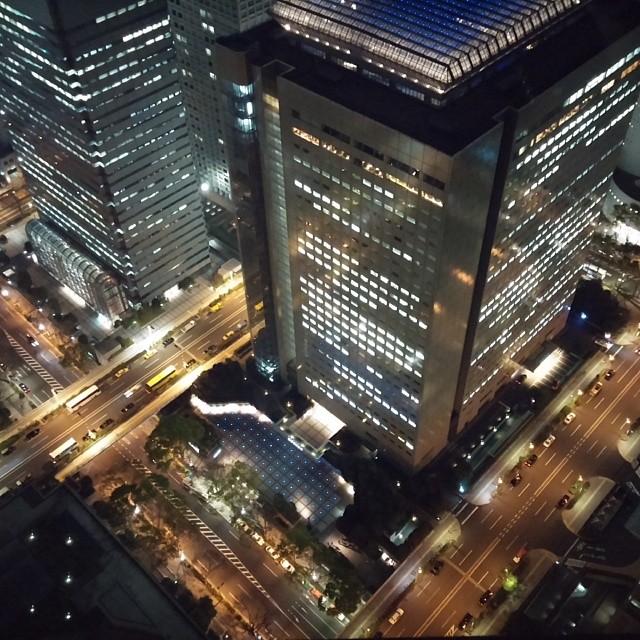
-Next, head to Shinjuku station and you have about a 10 minute walk ahead of you, to the Tokyo Metropolitan Government Building. You can use pocket wifi and Google maps to get you there, or if you’re good with directions, look it up ahead of time. If you’re not using the JR Pass, you can instead take the Oedo Subway line and hop off at Tocho-Mae station. You’re now literally in the basement of the Tokyo Metropolitan building. If this happens to be a Monday, they might be closed. Make sure you check ahead of time! There is no cost to ride up to the observation deck, and you get awesome views. There are expensive observation decks you can get tickets to, but I prefer this one because it’s amazing and it’s free. Win-win. If you have a bag, they will check that before you’re allowed up.
-If you want more night life, head to Ginza, or even back to Shibuya. If you’re not about that night life, you can head back to your lodging now.
Day 3
-Nokogiriyama
-Akihabara
This is my absolute most favorite day trip to take. I mean really, I want to live my life in Kyonan, but life is cruel and unfair, so I live in Utah. Hey, at least there’s mountains. I suggest waking up early, giving you plenty of time to explore.
-Head to the amazing Nokogiriyama and live your best life in the magical mountains. Here is a full post about it, so that you know how to get there and what to expect, if you decide to take this day trip. You should. You really, really should. If there’s one thing you take away from this itinerary, let it be that Nokogiriyama is one of the most beautiful and amazing places I’ve ever seen on my travels.
You’re going to be really tired when you get done, so if your lodging doesn’t have a perfect Japanese soaker tub, you might want to consider booking a trip to an onsen or sento this evening, and really let yourself relax in the healing waters.
What’s the difference between onsen and sento? Onsen are from natural hot springs, generally already hot from their source and filled with different minerals. Sentos are generally heated, public bath houses.
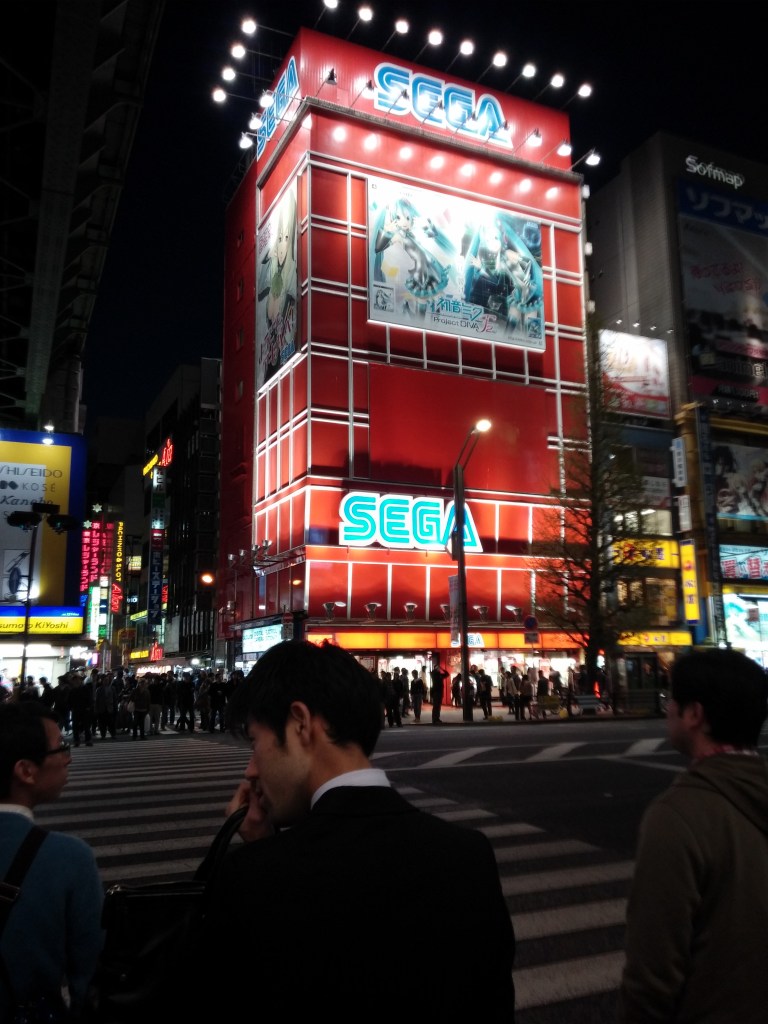
-Head back into Tokyo and if you didn’t eat enough and you’re starving, get yourself something to eat. Akihabara is hopping, full of so much to see and do. There is shop after shop after shop, and that is moving upward. Stores are stacked on top of each other, explore upward, or down, to see everything offered in a building.
-Check out the Kanda Myojin shrine and/or Tokyo Daijingu shrine. Visit the Manseibashi bridge, which is a shopping mall in an abandoned train station. Game watch at an arcade or even try your hand at one that looks interesting. Depending on how long you stayed in Nokogiriyama, you might have a lot of time to spend in Akihabara, or you might only want to spend an hour or two. Make sure you get yourself some dinner, though. You do you, take care of yourself after your mountain adventure. Go back to your lodging, take a relaxing bath. Or go to an onsen or sento, and relax there.
Day 4
-Todoroki Valley
-Ueno
-Asakusa
-Grab yourself some breakfast and head to Todoroki Valley.

This beautiful nature spot is so lovely, and still in Tokyo. I spent half a day here, but you might only spend a couple of hours. Here is a post on Todoroki Valley, if you want more advice on how to get there and what to expect.
-After you’ve explored, head into Ueno. If it’s lunch time, eat now. Check out the National Museum of Nature and Science or the Tokyo National Museum. There are actually a ton of museums in Ueno, so see what tickles your fancy and head there. Check out Ueno park, and don’t miss the Kiyomizu Kannon-do on the property, which is free of charge. Also check out the Toshogu Shrine, in Ueno park. Make sure you’ve gotten something to eat by this point.
-Next, head to Asakusa. When in Asakusa, you’ve gotta check out Sensoji Temple. You can then check out Asakusa Shrine next door. The temple is Buddhist, the shrine is Shinto. The Nishi Sando Shopping Street isn’t far from here, have fun looking through the little shops on this covered shopping street. The Asakusa Culture Tourist Information Center is located in a building on the 8th floor and though it’s not strikingly high or anything, you do get some good views of Asakusa. Check out the Ekimise Shopping Center and get yourself some dinner whether in Ekimise, or the surrounding area.
Day 5
Nikko
I can’t believe I haven’t done a post on Nikko. Probably because the last time I went was in 2014 and my photography then was even worse than it is now. I have a post on Nikko if you’d like additional information! There are a couple of different ways to get to Nikko. You can take the Limited Express Nikko-Kinugawa line from Asakusa station. It takes just under two hours and costs 2860 yen one way. You can buy the Tobu Nikko pass and the train is covered, you just have to pay the 1100 yen Limited Express train fee. It will also cover a lot of Nikko activities, so you might want to look into it to see if it will benefit you. If you’re doing the full two weeks of JR Pass, then you can take the JR Tohoku Shinkansen at no cost to you. You’ll just want to make sure to transfer at Utsonomiya to the JR Nikko Line. You can also take the JR Limited Express from Shinjuku, but it isn’t any faster than the Limited Express Nikko Kinugawa and costs 4080 yen one way. Definitely not your cheapest option. You can take local trains for a much cheaper, and slower, way there. But note that you have to change trains a few times if you choose this method. Whichever method you choose, make sure you choose your departure and return time carefully, as some lines run limited trains each day. You’ll want to make sure you have a train back into Tokyo.
Wow, this seems like a lot of work. Is it all really worth it? Yes, it is so worth it. Nikko is indescribably beautiful and there is so much to see here. In fact, if history is more your thing, you might want to scratch day 4 from this itinerary and make day 4 and day 5, Nikko. You can easily spend more than one day here. But if it’s your first trip to Japan, I think it’s best to go for a day trip and get a taste of it. You can always plan another trip to Japan if you want to spend more time there *wink*.
-What do you do in Nikko? Well, what don’t you do in Nikko? No, but really. How about them UNESCO sites, though? There are 103 buildings and the surrounding land are listed as a UNESCO World Heritage Site. That is a whole lotta shrines and temples.
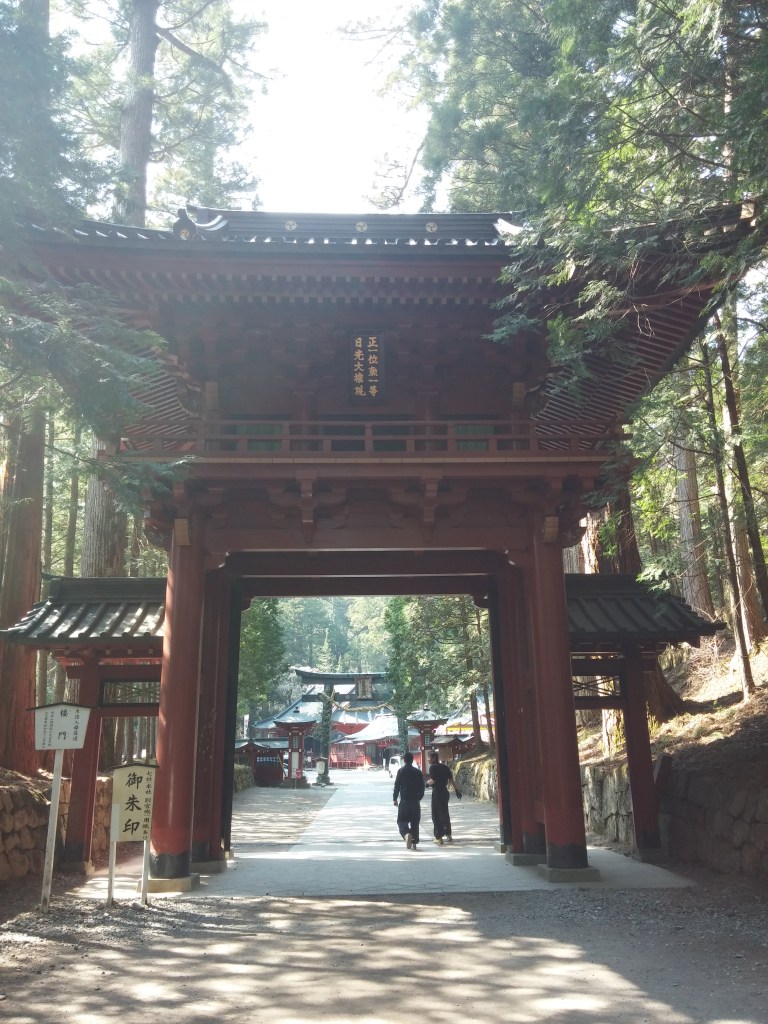
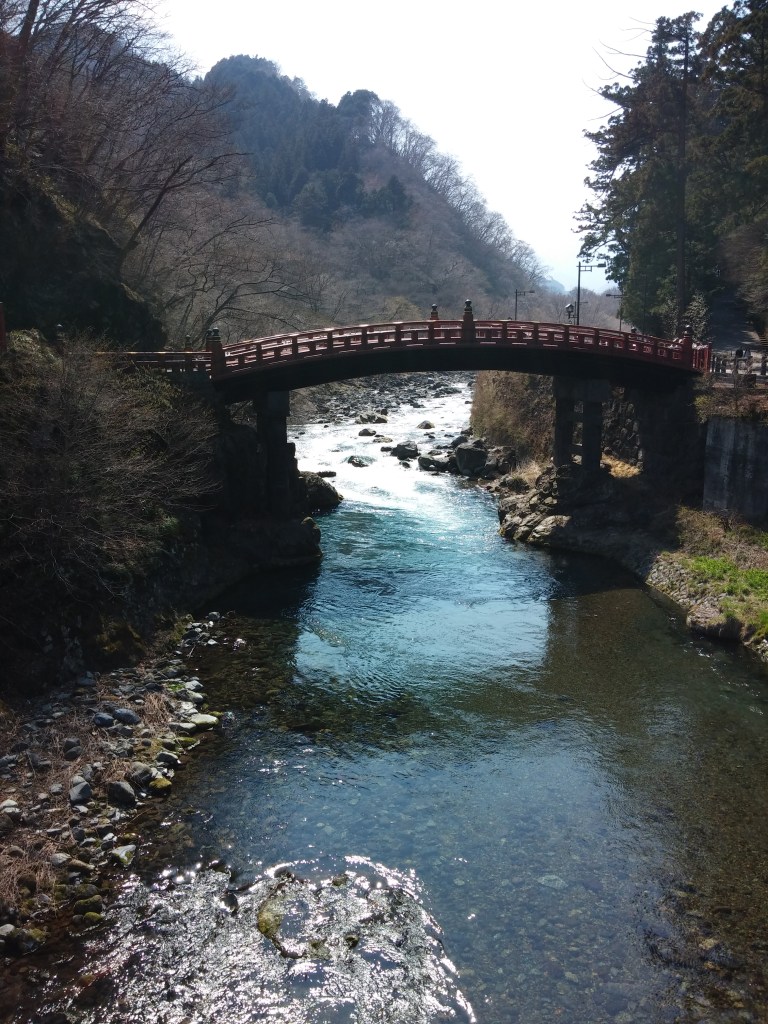
-The Shinkyo Bridge is a pretty sight, turquoise waters running underneath it. Don’t miss the Kunozan Toshogu Shrine and the famous see no evil, speak no evil, hear no evil monkeys. There’s also the Sozo-no-zo, which are elephants carved by an artist who had never seen them. There’s the Futarasan-jinja Shrine and the Rinnoji Temple. Make sure to visit Taiyuinbyo Shrine, which is also a mausoleum. Every building you come across is gorgeous, I swear.

One thing, make sure you eat some breakfast before embarking. Then try to eat something before heading to the sights. If you don’t, then make sure to stop at a konbini and pack a lunch. You’ll want food for fuel, since you’ll be out exploring all day. You can catch dinner back in Tokyo after your long train back “home”. You might want to take a little nap on this train, you were out all day exploring, after all.
Day 6
-Osaka
-Dotonbori
It’s time to say goodbye to Tokyo, for now. We’re hopping on the shinkansen and heading to Osaka! If you only have the 1 week JR Pass, today is the day that you will activate it. I recommend visiting a JR Travel center a few days in advance, tell them you want to activate your pass for whatever this date is going to fall on, and that you’ll need a ticket to Osaka that same day the pass activates. Here is a guide on activating and using the JR Pass, if you want to read up. You can eat on the shinkansen, so grab yourself a bento before boarding. There’s also a snack cart that will occasionally come through.
If you arrive in Osaka too early to check into your lodging, there are luggage lockers at Osaka station that you can store them for a bit until you’re able to check in. Unless you don’t mind lugging it with you, but count me out, there. Japan is not built the best for that. I love Osaka so much. It was the first place I ever explored in Japan and will always have a special place in my heart. Osaka is a completely different vibe from Tokyo. Or… anywhere else in Japan, really. Once you go there, you’ll understand what I mean. Osaka is Osaka, and nowhere else compares.
In case you’re waiting to check into your hotel, here are a few thing to check out by the station.
-Daimaru Umeda is a large department store right there in the station. There’s something here for everyone. Sanrio, Pokemon, Tokyu Hands, clothing, make up, skin care, and more. You could probably spend a huge chunk of time here, as well as eat some lunch, if you’re trying to kill some time to check into your hotel.
-About ten minutes on foot, you can reach the Nakajimasosha Shrine.
-Now get on to your hotel, check in, and it’s time to check out Osaka. Some things to possibly check out before you hit the night life: Shiteno-ji Temple (one of the oldest Buddhist temples in Japan), try your hand at pachinko in one of the many parlors, go ride the HEP 5 Ferris Wheel.
-Then head to the famous Dotonbori! This place really comes to life at night. Get a photo in front of the famous Glico Man, ride another ferris wheel at Don Quijote. Take a Dotonbori river cruise from the Tazaemonbashi Bridge Boat Dock, or alternatively, stroll along the Tonbori Riverwalk. Walk through Shinsaibashi’s Shotengai, one of the longest shopping streets in Osaka. There are endless places to choose from for dinner. Or you can hop around from restaurant to restaurant and get your fill on appetizers.
It’s been a busy day, go back to your lodging and get some shuteye.
Day 7
-Osaka Castle
-Koreatown
-Shinsekai
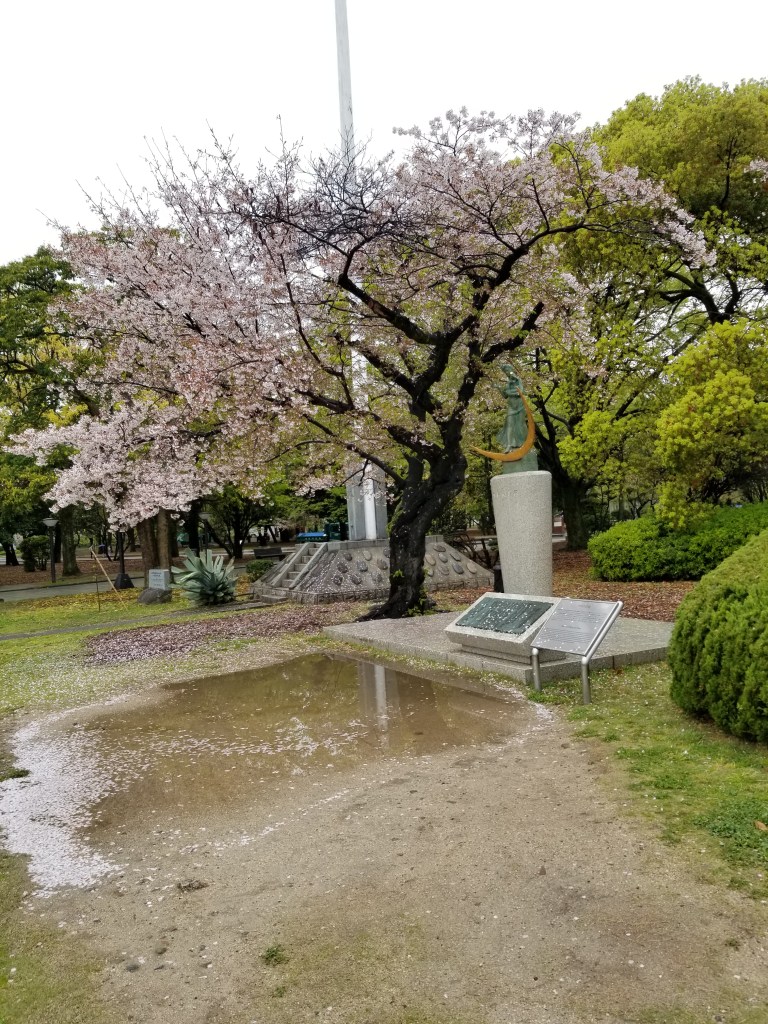
Start your morning by heading to Osaka Castle.

Take your time exploring the beautiful park around it. Maybe rent a bicycle, or take a boat ride around the castle moat. There is a museum inside of this castle, it’s really cool. I spent quite a bit of time here and enjoyed every minute of it.
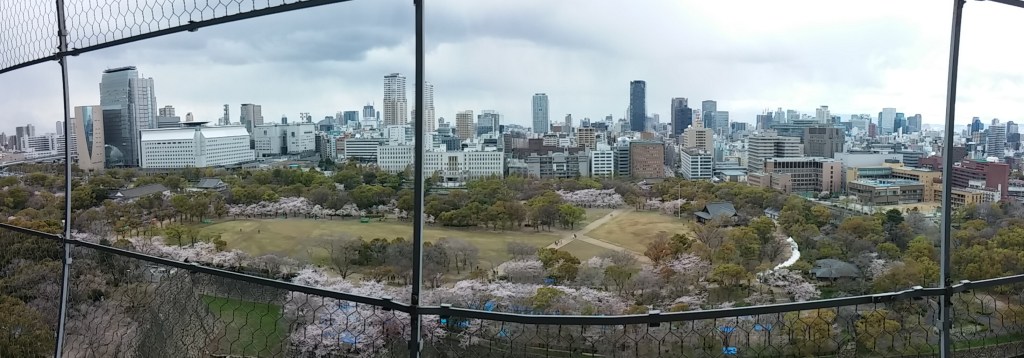
You can also get a nice view of Osaka from a viewing platform in the castle.
-Explore the largest Koreatown in Japan, Tsuruhashi, and get inspiration for planning your trip to South Korea *wink*. If you love Korean food, this would be a good place to have some lunch. Check out K-Station or SAMI for KPop and KDrama paraphernalia if you’re into that, or the Korean skin care products.
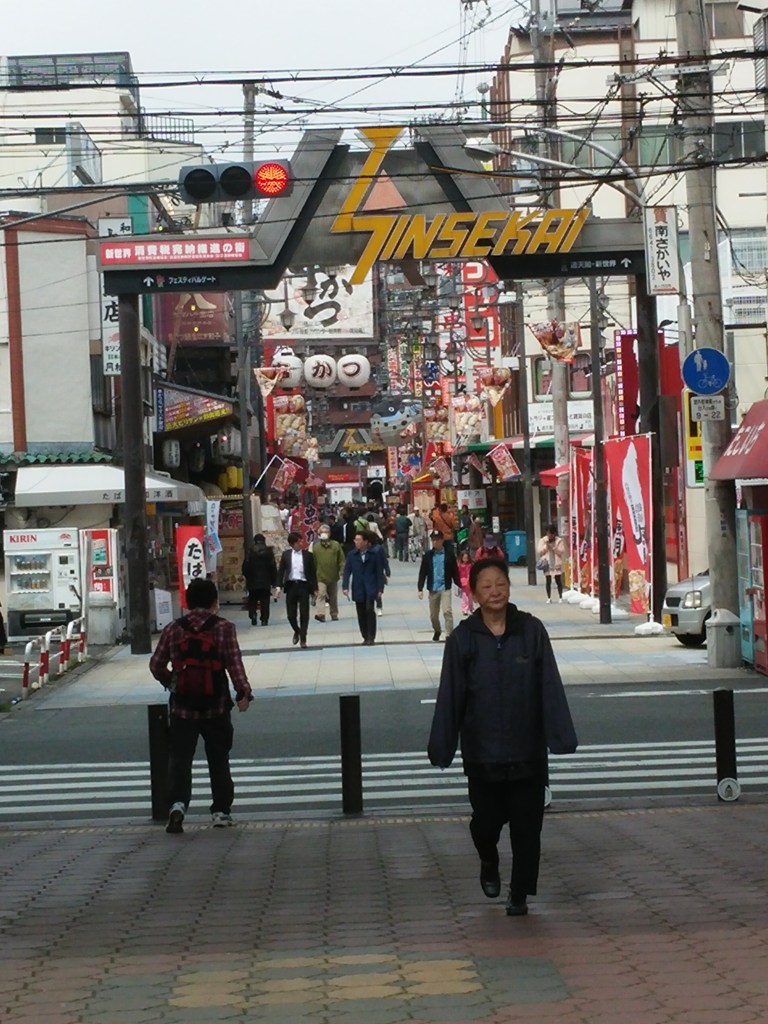
-After exploring the many shops of Koreatown, head on down to Shinsekai. Snap a photo of Tsutenakaku tower, and for 800 yen, you can ride up it’s seven floors, with different activities. Visit Isshinji Temple and Shinsekai Inari Shrine, or Shitennoji Temple with its five story pagoda. Wander Jan Jan Yokocho, an arcade district. This is an excellent place to get dinner, there are so many restaurants in the area.
Day 8
Pick one!
-Universal Studios
-Hiroshima
If both of these points interest you, you can easily tailor your first day in Osaka to see the points you really are interested in, then use day two and three of Osaka for Universal Studios and Hiroshima. Universal Studios might still give you a little less than half a day left to check out a few of the other things already listed.
-Universal Studios is 7800 yen for a 1 day adult pass. I know it is a bit expensive, but if you’re into amusement parks, this one is awesome. You get the Harry Potter side as well, and they’re also opening up a Super Mario area, which looks awesome. You can easily spend a day here, getting your lunch in the park, eating dinner later on after getting back into the city

-Hiroshima is about 1 1/2 hours from Shin-Osaka station, and if you’re going to do this day trip, I recommend booking your shinkansen tickets for it when you initially arrive in Osaka. This is a popular stop and it’s not uncommon for the reserved train to be sold out. You might get stuck in the unreserved train, and be standing, for that 1 1/2 hours.
-Take the historical and ever charming Hiroshima Tram to the Atomic Bomb Dome hypocenter. The building still remains and is incredibly eerie to be in the presence of when you are thinking about the why behind all of it. My sister is really into history, and more specifically, WWII, so this entire day trip was really something else to be able to experience. Even if you aren’t into WWII history, this is still such an important area. After seeing the building, head toward the river and take a few minutes strolling along it, on the pathway down the stairs.
-Head to the Hiroshima Peace Park. There are a lot of statues and monuments within the Peace Park, including the Flame of Peace. It was a bit chilly on the day we were here, but that didn’t hinder our experience at all. Everything was so interesting that it was easy to ignore the cold for a while to see it all.
-Visit the Hiroshima Peace Memorial Museum, it’s only 200 yen to enter and there is a lot to cover in here. Watch the videos of the people who lived through the bombing, see the recovered items like clothing and cookware. It can be hard to look at a lot of it, but look at the photos of the people, know what they went through. This is the goal of the Peace Museum, to show the ugly reality of atomic bomb warfare and their goal is to abolish it. Visit the giftshop, there are books in English here, you might find something to take home and share.
-Make sure to find some time to eat here. You can so easily get caught up in everything that you sort of… forget to eat! Depending on how long you decide to spend in Hiroshima, you may or may not have a few hours of nightlife ahead of you, back in Osaka.
Day 9
-Nara
-Kyoto
Now this gets a bit tricky because after Nara, we’re heading to Kyoto and checking into our Kyoto lodging. We’re going to have our luggage with us. Two options here. The first option is more expensive, but might be worth it to you. Use a luggage service to send your luggage from Osaka to your Kyoto lodging (make sure to prearrange with them beforehand that it’s okay to do this). The second option is much simpler, but may not work if you have a ton of luggage. Nara Station has luggage lockers. Store your luggage there while you’re exploring Nara.
-On the way to the famous park, you might want to stop at Isui-en Garden. It’s really pretty and makes for a nice stroll. It is 650 yen to enter, if that helps narrow your decision.

-Head to Nara Park, where all the magic happens. This park is ginormous with so many cool structures on its property. I want to make a post on Nara. If I do, I’ll definitely link it here. What to do at the park? For starters, spot the deer! Though be cautious if you should decide to buy the deer snacks to feed them. The stories are true, some of them are very aggressive if you don’t give them all you got. They are still wild animals, after all. I actually kind of got attacked by one when I didn’t give him everything! It was both hilarious and terrifying.

-Oh, the buildings! Really, there are some gorgeous structures here. Todai-ji Temple is one of them. The Daibutsu-den hosts a 52 ft (16 meter) high Buddha, then head back to see the pillar with the hole. There’s also the Sangatsu-do hall in the temple complex. Another cool structure.
-Admire the Kofuku-ji five story pagoda. You can get right up to this one, it’s really cool. The detail on it’s design is beautiful. Kofuku-ji Temple is right here as well.
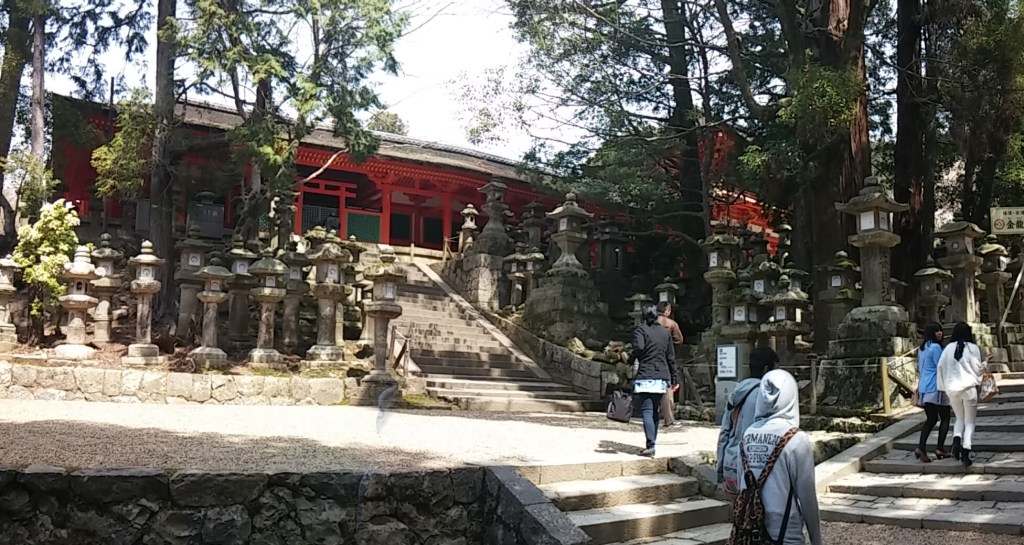
-Keep going further into the park because you’ll come upon pathways lined with mossy tourou (stone lamps). And that means you’re coming up to a Shinto Shrine. This one is the Kasuga-Taisha Shrine and oh my, is it lovely. I love places in the middle of forest surroundings and this is one of them.
-Other things you can check out in Nara are the Nara National Museum (close to the park), visit the old fashioned area of Naramachi. Horyu-ji Temple is further out of the way, but contains some of the most important Buddhist images, as well as oldest wooden buildings, in the country.
-It’s been a day of walking, so make sure to listen to your body and head back to the train station when you think you should. Get your luggage out, and head to Kyoto. I would recommend exploring the area around your lodging, getting you something nice to eat for dinner. If you haven’t already done some laundry, this might be a good day to do it. Find a laundromat near your lodging, if your lodging doesn’t have one. Keep it close, you’re probably tired!
Day 10
-Kyoto
-Fushimi-Taisha Inari Shrine
-Kiyomizu-Dera
-Start early, if you’re up for it. Because the earlier you visit a shrine, the better. This one is always open, so if you’re up at 5AM, might as well make the most of it. Okay, I know most people don’t wake up that early, but still, I would try to set off before 8:30AM so that you can get a chance to experience it before it’s too crowded. There’s a lot to see here and scattered all around. Take your time checking it all out.

-Head to Kiyomizu-Dera Temple. This is a UNESCO World Heritage Site and it’s such a cool structure. You also get amazing views of Kyoto from here, it’s one of those must sees that I agree with. It does get crowded, but it’s easy to see passed the crowd for this one.
-Check out the Gion district and all it has to offer. There are tons of restaurants and shops here, you can easily get lost in them. See the Yasui-Kompira Shrine, you can even write down your hopes to place on the stone at the shrine.

-Other things to check out: Maruyama Park for sakura viewing, Kyoto International Manga Museum, Yasaka Pagoda. You might want to sign up for a cooking class, or participate in an English walking tour.
Day 11
-Kyoto
-Saga (Arashiyama)
-Start early and head to the Arashiyama bamboo grove.
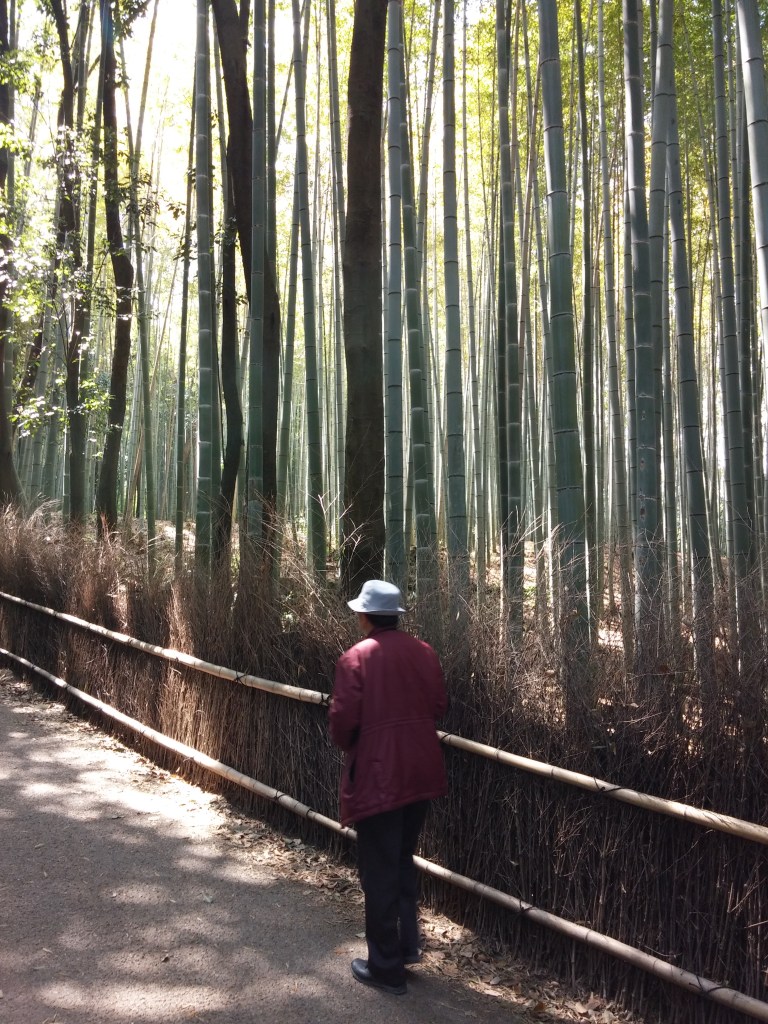
If you want to see it, anyway. It’s super crowded and over tourism has sadly kind of killed the vibe. There’s another bamboo grove you can check out in Arashiyama (read ahead) or Kamakura (day 13) if you’d rather. Before this, you might even want to consider the Sagano Scenic Railway. They aren’t lying when they say it’s scenic. This is a super beautiful train ride for 630 yen.

-Take a walk over the Togetsukyo Bridge, and walk along the river. Visit Tenryu-ji Temple, see the Dharma Hall and the beautiful pond garden, among other things to see. Visit the small, but charming, Ninomiya-jinja Shrine, next door to the Tenryu-ji Temple. Jojakko-ji Temple is another really cool one, a bit more work to get to it, but stunning views as reward. There is a very ominously photogenic two story pagoda here. Adshino Nenbutsu-ji Temple is home to thousands of stone statues, and also another bamboo grove that is much more serene than the previously mentioned.
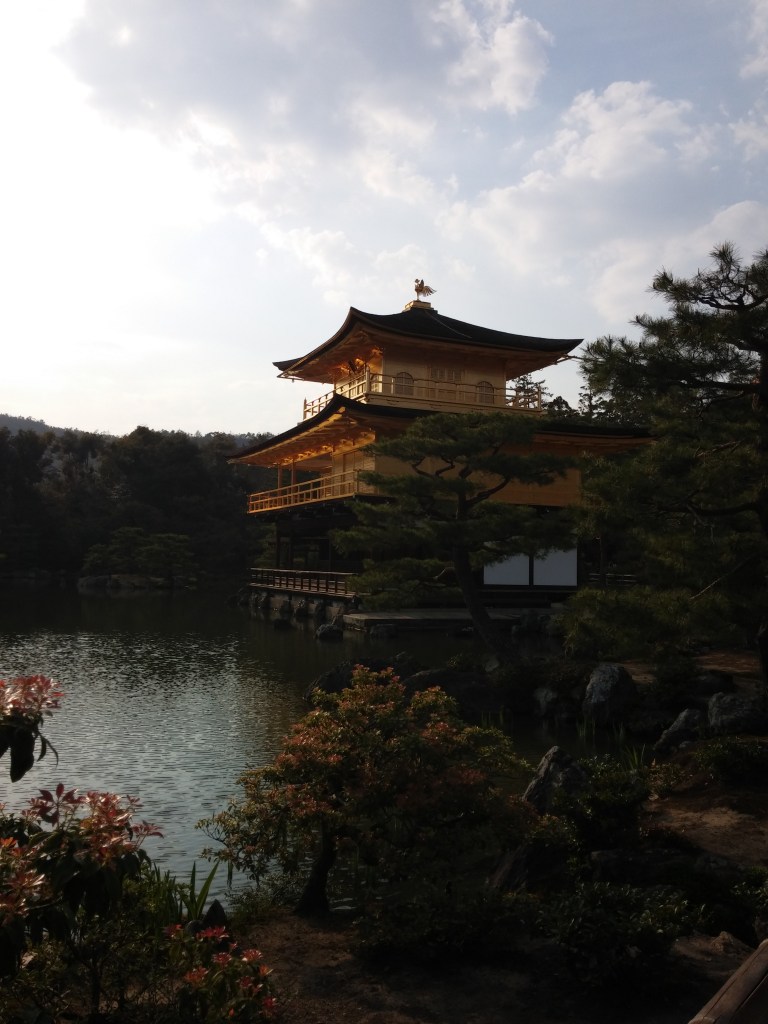
-If you still are enjoying these temples and shrines, here are a few more in Kyoto you might want to consider: Kinkaku-ji and/or Ginkaku-ji, they’re crowded, but pretty. Nanzen-ji Temple at one end of the Philosopher’s Path, which has a cool brick aqueduct as well as a garden with a small bamboo grove. Otagi Nenbutsu-ji Temple with 1200 smiling little stone statue Buddha disciples. Yoshida Hill, home to both temples and shrines that are usually much less crowded.
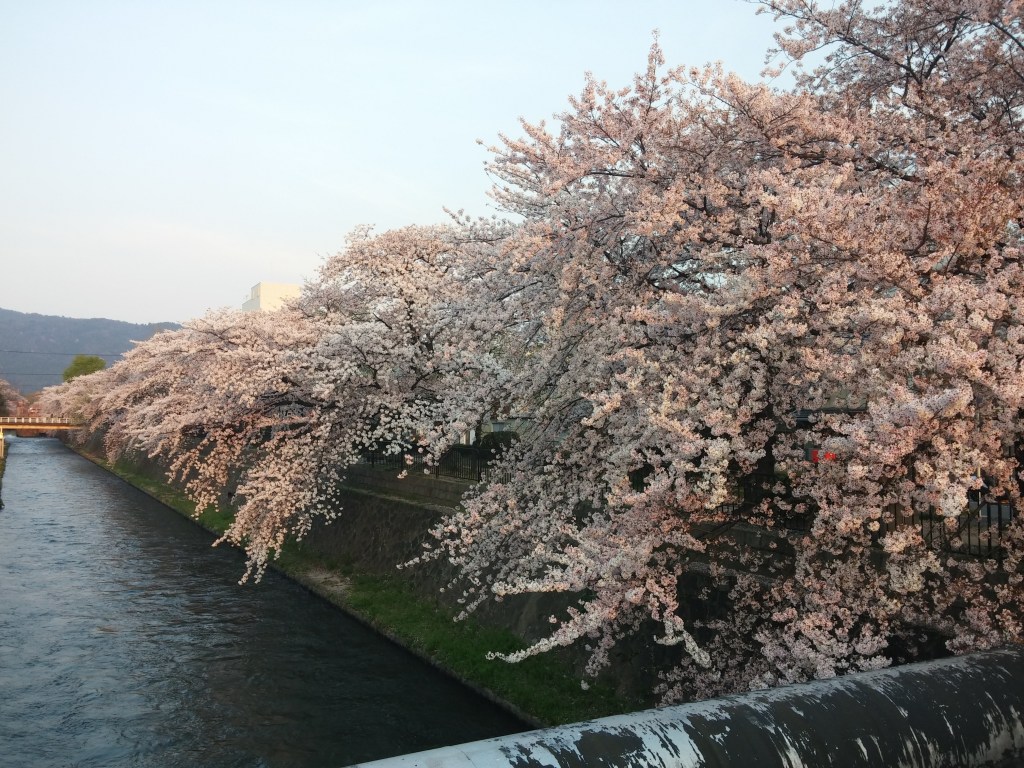
-If you’ve had your fill of temples and shrines, you may want to check out these things: Rent a bicycle and bike along the river. For 200 yen, you can visit the Kyoto botanical gardens. Take a traditional dance class. Visit the samurai and ninja museum or the Kyoto Railway museum. Go bar hopping. If it’s Spring, walk around to different parks and you’re bound to find local festivals taking place (so much fun to experience!).
Day 12
-Kyoto
-Tokyo
Our JR Pass expires today, if we’ve purchased the 1 week, so we’re going to head on back to Tokyo. But first, there’s one more thing on our list. Check with your lodging ahead of time if they can hold onto your luggage for you. Most places will do this, no problem. If they don’t have the ability to do that, first head to the closest train station with luggage lockers and hold them there for a couple of hours.
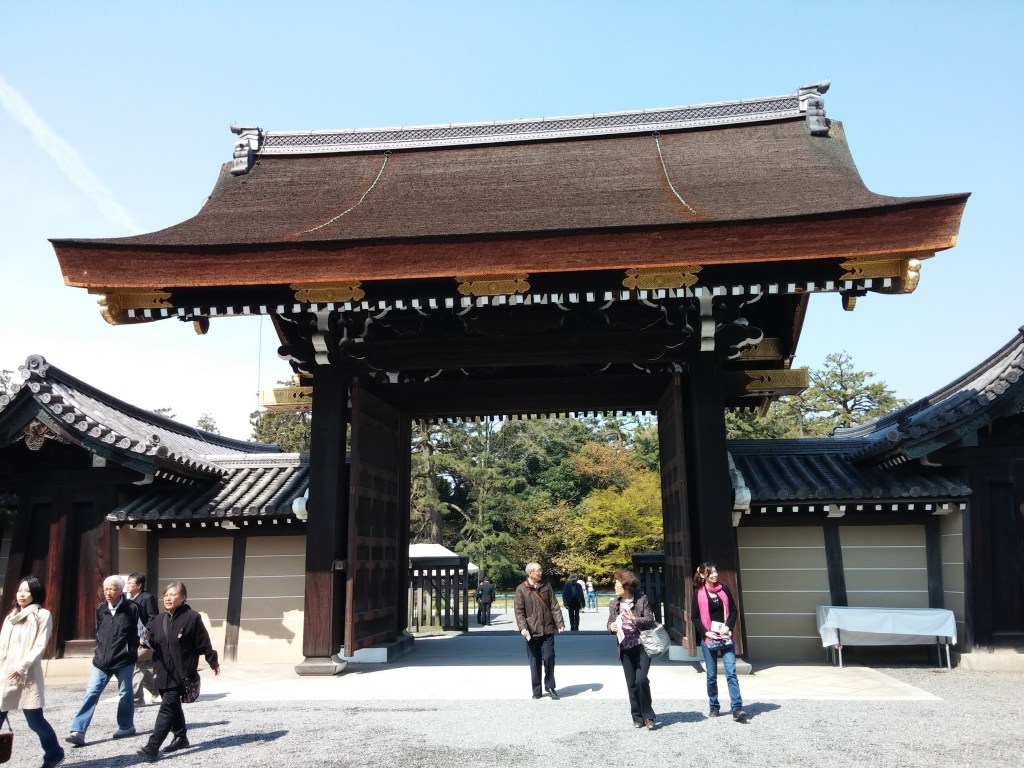
-Wake up only a bit early, grab you something to eat and head to the Kyoto Imperial Palace, to be there at the 9:00AM opening. The Imperial Palace grounds are quite large and have a beautiful attached garden. Some of the rooms are opened up and you can see inside. It’s really cool to check out and they usually have some souvenir booths you can get unique items from.
Take the shinkansen back to Tokyo. If you want to pop into Nagoya for a bit, that’s always an option. But you don’t have a lot of time to spend there, so you might want to save that for your next trip.
-After checking into our lodging, we’re going to check out the Tokyo Imperial Palace. Stroll along the grounds or rent a bicycle. You may even want to look into a bicycle tour or walking tour of the palace grounds. There’s a park and two gardens here, a lot of ground to cover, so you can decide how much or how little you want to spend here. You can sign up in advance for a guided tour, which will take you further to explore the Palace grounds. It’s free, but spots are limited so I would suggest reserving your spot a day in advance. Maybe two, if it’s sakura season.
There are tons of restaurants in this area (including vegan options!), so get yourself something to eat around here. If you have additional time, this is a good chance to revisit any Tokyo areas you couldn’t get enough of.
Day 13
-Kamakura
-Enoshima
-Kamakura takes about an hour by train, and is around 900 yen each way.
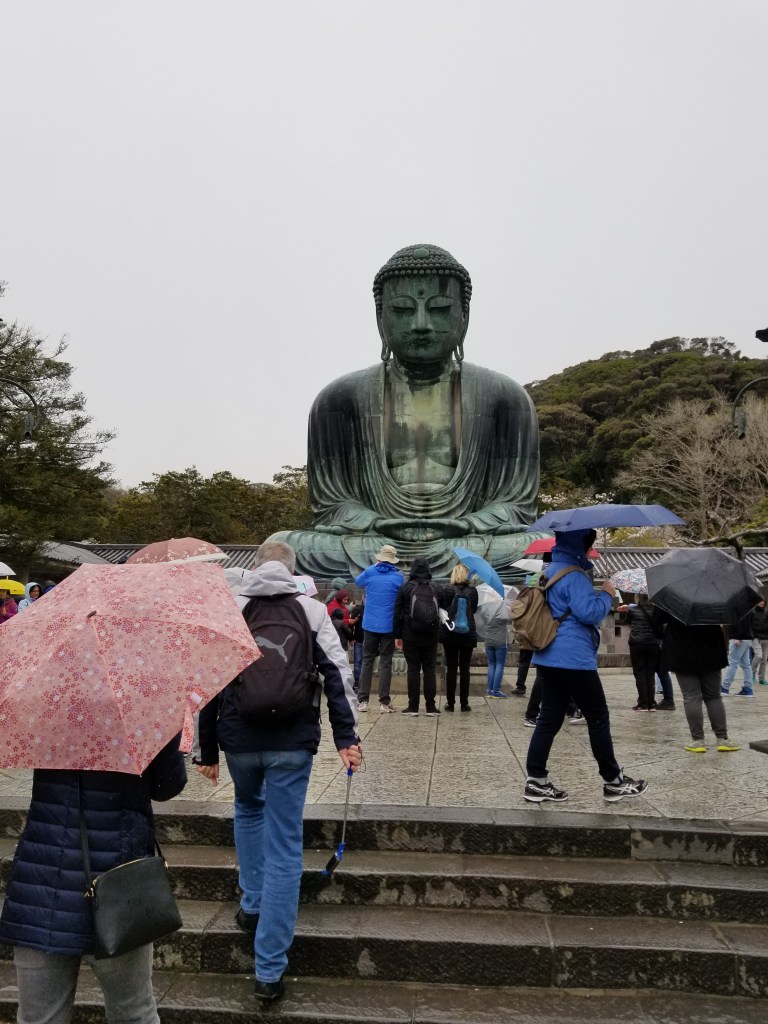
Most people only go to visit the Daibutsu, but there is a lot more to see! The Kotoku-in Temple houses a 43 ft tall Buddha that you can even go inside of for a fee.
-If you’re already here, you should check out some of the other cool temples and shrines in Kamakura. Hokokuji Temple (this is where you’ll find the other mentioned bamboo grove), Hasedera Temple, Kenchoji Temple (most important zen temple in Kamakura), Engakuji Temple, Zuisenji Temple, Tokeiji Temple (formerly a home for abused wives seeking help), Zeniari Benten Shrine, and Hachimangu Shrine. These are just a handful, and ones I appreciate the architecture of. There are even more out there, so find the ones that call to you the most and check them out! You might consider joining a walking tour for some of these stops. Depending on your energy levels, there’s also hiking trails behind Kotoku-in.
-Hop on the Enoden Railway and ride to Enoshima Island. If it’s a clear day, you’ll be able to see Mt. Fuji from here. Enoshima Shrine has three separate shrines around the island. If you’re there as a couple, hike to the Love Bell and ring it together. Tour the Iwaya Caves as long as the weather is good. Stroll the Samuel Cocking Garden and get nice views from the observation tower. You might consider purchasing the Enopass, which gets you into the caves, garden, and observation tower for free, as well as discounts to other sights on the island.
Day 14
-Tokyo last hurrah
-Head to airport
What you have time to do today is going to depend on what time your flight leaves. Here are some ideas!
-Decide what area you want to revisit and spend some time there.
-Did you buy too many souvenirs? Head to Ueno Station and next door is Ameyoko Shopping Street. They have duffle bags here, but make sure you check the shops first before making a purchase. Closer to the front of the street, you’ll see they’re much more expensive than they are further down. Unfortunately I don’t remember the name of the shop where I bought mine, they were so nice and helpful. Remember to take photos of the places you love so that you’ll remember them for other trips, or to help other travelers.
-Go back to that beloved restaurant you don’t ever want to part from, but know it’s now inevitable (T’s TanTan 😦 )
-Get one last round of shopping done at Beams Japan Shinjuku flagship store, and check out several floors of made in Japan items.
-Stroll and relax through Shinjuku Central Park or Shinjuku Gyoen National Garden.
-Browse through LGBT literature at Cafe Okamalt, which is dedicated to it, specifically.
-Stop in Kabukicho to see the famous Godzilla.
Now depending on what airport you’re flying out of, you already know the different options of getting there from main Tokyo. If you did buy the JR Pass for 2 weeks, remember that the NEX train is covered, just be sure to book your seat ahead of time.

Try not to feel too sad as you board your airplane home. You can always plan another trip and come back again. And again. And probably again, because Japan is that country that you can never get enough of.

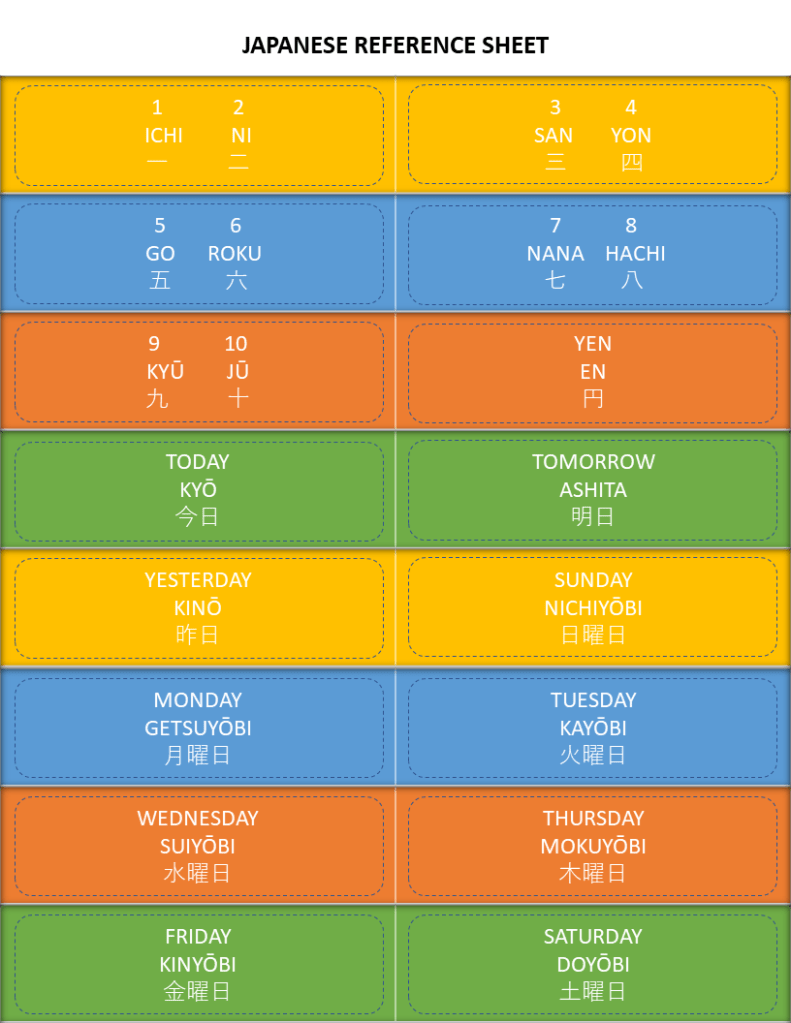
Download my cheat sheets with basic Japanese to take along the way, you can print them out, or use PDF digital copies.

2 Comments Add yours